
Among the modern HTML standards and specifications, there’s something called Custom Elements. For those unfamiliar, it’s a way to create your own tags, which the browser automatically initializes when it encounters them in the markup, executing the specific behavior logic you’ve defined. Also, there’s a way to modify the behavior of standard tags (though the nuances of this are beyond the scope of this discussion).
In this tutorial, we will create a smart HTML tag—a text field that helps users format the text they enter. This tag can be used on any website, in any web application built with modern frameworks, or even in a simple static HTML file.
Preparatory Steps
First, let’s define the technologies we’ll be using. We need to initialize a project with Parcel, get familiar with the Symbiote.js library, and obtain an API key from ChatGPT. If you are not familiar with Custom Elements, please read the howto.
Install Symbiote.js
SymbioteJS is a lightweight JavaScript library designed to simplify the creation of web components and improve the development experience with custom HTML elements. Built with modern web standards in mind, it offers a simple and efficient way to structure, style, and manage reusable components, without the need for heavy frameworks.
Create a Component
Next, we’ll create our component. Since this project is quite small, we’ll implement it directly in the app.ts file.
import Symbiote, { css, html } from '@symbiotejs/symbiote';

import Symbiote, { css, html } from '@symbiotejs/symbiote';

export class SmartTextarea extends Symbiote {
  // The object that initializes the state and core entities of the component:
  init$ = {};
}

// Styles of component
SmartTextarea.rootStyles = css``;

// Template of component:
SmartTextarea.template = html``;

// Define a custom HTML tag:
SmartTextarea.reg('smart-textarea');
Now let’s create a HTML file
<script type="importmap">
  {
    "imports": {
      "@symbiotejs/symbiote": "https://esm.run/@symbiotejs/symbiote"
    }
  }
</script>
<script type="module" src="./smart-textarea.js"></script>

<smart-textarea model="gpt-4o-mini"></smart-textarea>
An important aspect here is the block with the import map. In our example, we will include the SymbioteJS library via CDN, which will allow us to efficiently and repeatedly share a common dependency among different independent components of the application, without the need for bulky solutions like Module Federation. Also, since we initially installed the dependency through NPM, we will have access to everything necessary for our development environment tools, including type declarations for TypeScript support, entity definitions, and more.
Template
Let’s create a template
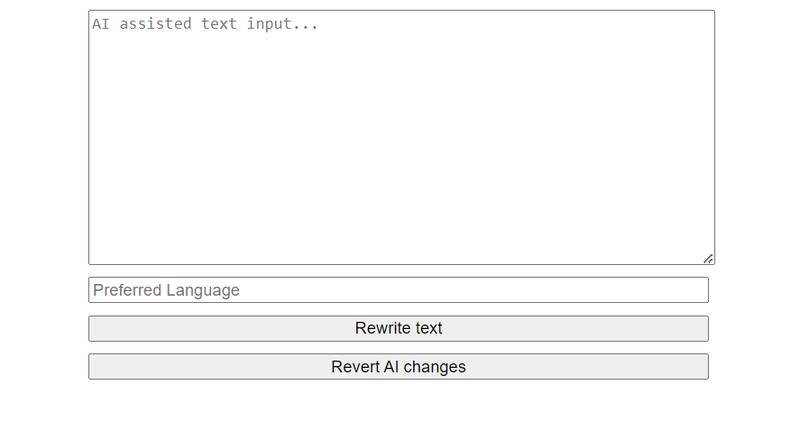
SmartTextarea.template = html`
  <textarea
    ${{ oninput: 'saveSourceText' }}
    placeholder="AI assisted text input..."
    ref="text"
  ></textarea>

  <input type="text" placeholder="Preferred Language" ref="lang" />

  <label>Text style: {{+currentTextStyle}}</label>
  <input
    ${{ onchange: 'onTextStyleChange' }}
    type="range"
    min="1"
    max="${textStyles.length}"
    step="1"
    ref="textStyleRange"
  />

  <button ${{ onclick: 'askAi' }}>Rewrite text</button>
  <button ${{ onclick: 'revertChanges' }}>Revert AI changes</button>
`;
The code snippet defines a template for a SmartTextarea component using a template literal. This template describes the HTML structure of the component, along with some dynamic bindings and event handlers.
{
  {
    +currentTextStyle;
  }
}
The plus sign (+) at the beginning of the name indicates that the property is computed, meaning it is automatically derived when the state properties change or can be manually triggered using a special method called notify.
State Entities and Handlers
Now let’s describe the properties and methods that we bind to the template.
export class SmartTextarea extends Symbiote {
  // Store the user's original text in a private class property
  #sourceText = '';

  init$ = {
    // LLM name by default
    '@model': 'gpt-4o',

    // The computed property contains the description of the style to which we need to format our text.
    '+currentTextStyle': () => {
      return textStyles[this.ref.textStyleRange.value - 1];
    },

    // Save the user's text for the undo function.
    saveSourceText: () => {
      this.#sourceText = this.ref.text.value;
    },
    // Restore the textarea to the original text.
    revertChanges: () => {
      this.ref.text.value = this.#sourceText;
    },
    // Respond to text style selection.
    onTextStyleChange: e => {
      // Manually trigger the recalculation of the computed property.
      this.notify('+currentTextStyle');
    },

    // ...
  };
}
Now we need an array containing descriptions of text styles, which we will create in a separate module called textStyles.ts with the following content:
export const textStyles: string[] = [
  'Free informal speech, jokes, memes, emoji, possibly long',
  'Casual chat, friendly tone, occasional emoji, short and relaxed',
  'Medium formality, soft style, basic set of emoji possible, compact',
  'Neutral tone, clear and direct, minimal slang or emoji',
  'Professional tone, polite and respectful, no emoji, short sentences',
  'Strict business language. Polite and grammatically correct.',
  'Highly formal, authoritative, extensive use of complex vocabulary, long and structured',
];
Also, in the code above, we can see examples of how to access the elements described in the template using the ref interface, such as:
this.ref.text.value;This is similar to how it works in React and helps avoid manually searching for elements using the DOM API. Essentially, this.ref is a collection of references to DOM elements that have the corresponding attribute set in the HTML template, such as ref=“text”.
Request to the LLM
Now we need to do the most important thing: ask the AI to rewrite our text according to the specified settings. In this example, I will keep it as simple as possible, without using any additional libraries or access control layers, by sending a direct request to the API:
export class SmartTextarea extends Symbiote {
  // ...

  init$ = {
    // ...

    askAi: async () => {
      // If the textarea is empty, we cancel everything and display an alert:
      if (!this.ref.text.value.trim()) {
        alert('Your text input is empty');
        return;
      }

      // We send a request to the API endpoint taken from the configuration:
      let aiResponse = await (
        await window.fetch(CFG.apiUrl, {
          method: 'POST',
          headers: {
            'Content-Type': 'application/json',

            // We retrieve the API key from a hidden JavaScript module that is not tracked by git:
            Authorization: `Bearer ${CFG.apiKey}`,
          },
          body: JSON.stringify({
            // Read the name of the required model from the HTML attribute (gpt-4o-mini),
            // or use the default model (gpt-4o):
            model: this.$['@model'],
            messages: [
              {
                role: 'system',

                // Pass the language and tone settings to the model:
                content: JSON.stringify({
                  useLanguage:
                    this.ref.lang.value || 'Same as the initial text language',
                  textStyle: this.$['+currentTextStyle'],
                }),
              },
              {
                role: 'assistant',

                // Describe the role of the AI assistant:
                content:
                  'You are the text writing assistant. Rewrite the input text according to parameters provided.',
              },
              {
                role: 'user',

                // Pass the text that we want to modify:
                content: this.ref.text.value,
              },
            ],
            temperature: 0.7,
          }),
        })
      ).json();

      // Wait for the response and update the text in the input field:
      this.ref.text.value =
        aiResponse?.choices?.[0]?.message.content || this.ref.text.value;
    },
  };
}
Now, we need to create a configuration module (secret.ts), which we will hide from prying eyes using .gitignore:
export const CFG = {
  apiUrl: 'https://api.openai.com/v1/chat/completions',
  apiKey: '<YOUR_API_KEY>',
};
Styles
We just need to add styles to our web component.
// ...

SmartTextarea.rootStyles = css`
  smart-textarea {
    display: inline-flex;
    flex-flow: column;
    gap: 10px;
    width: 500px;

    textarea {
      width: 100%;
      height: 200px;
    }
  }
`;

// ...
Full code
import { CFG } from './secret.js';
import { textStyles } from './textStyles.js';
import Symbiote, { css, html } from '@symbiotejs/symbiote';

import { CFG } from './secret.js';
import { textStyles } from './textStyles.js';
import Symbiote, { css, html } from '@symbiotejs/symbiote';

export class SmartTextarea extends Symbiote {
  #sourceText = '';

  init$ = {
    '@model': 'gpt-4o',

    '+currentTextStyle': () => {
      return textStyles[this.ref.textStyleRange.value - 1];
    },

    saveSourceText: () => {
      this.#sourceText = this.ref.text.value;
    },
    revertChanges: () => {
      this.ref.text.value = this.#sourceText;
    },
    onTextStyleChange: e => {
      this.notify('+currentTextStyle');
    },
    askAi: async () => {
      if (!this.ref.text.value.trim()) {
        alert('Your text input is empty');
        return;
      }
      let aiResponse = await (
        await window.fetch(CFG.apiUrl, {
          method: 'POST',
          headers: {
            'Content-Type': 'application/json',
            Authorization: `Bearer ${CFG.apiKey}`,
          },
          body: JSON.stringify({
            model: this.$['@model'],
            messages: [
              {
                role: 'system',
                content: JSON.stringify({
                  useLanguage:
                    this.ref.lang.value || 'Same as the initial text language',
                  textStyle: this.$['+currentTextStyle'],
                }),
              },
              {
                role: 'assistant',
                content:
                  'You are the text writing assistant. Rewrite the input text according to parameters provided.',
              },
              {
                role: 'user',
                content: this.ref.text.value,
              },
            ],
            temperature: 0.7,
          }),
        })
      ).json();

      this.ref.text.value =
        aiResponse?.choices?.[0]?.message.content || this.ref.text.value;
    },
  };
}

SmartTextarea.rootStyles = css`
  smart-textarea {
    display: inline-flex;
    flex-flow: column;
    gap: 10px;
    width: 500px;

    textarea {
      width: 100%;
      height: 200px;
    }
  }
`;

SmartTextarea.template = html`
  <textarea
    ${{ oninput: 'saveSourceText' }}
    placeholder="AI assisted text input..."
    ref="text"
  ></textarea>

  <input type="text" placeholder="Preferred Language" ref="lang" />

  <label>Text style: {{+currentTextStyle}}</label>
  <input
    ${{ onchange: 'onTextStyleChange' }}
    type="range"
    min="1"
    max="${textStyles.length}"
    step="1"
    ref="textStyleRange"
  />

  <button ${{ onclick: 'askAi' }}>Rewrite text</button>
  <button ${{ onclick: 'revertChanges' }}>Revert AI changes</button>
`;

SmartTextarea.reg('smart-textarea');
This template sets up a user interface that allows users to input text, specify a preferred language, adjust the style of the text using a range input, and interact with an AI for rewriting text. The use of ref and event bindings provides a way to interact with these elements programmatically within the SmartTextarea component, making it dynamic and responsive to user actions.
Now, run:
Now we can use the