
Today, we’ll create a simple game using PhaserJS and ReactJS. Despite the simplicity of the game, we will cover all the key aspects of game development with PhaserJS. We’ll explore concepts like scenes, prefabs, how to integrate PhaserJS with ReactJS, how to add third-party libraries and components, and how to use tweens for animations.
What is the PhaserJS ?
PhaserJS is a fast, open-source HTML5 game framework used for building 2D games for desktop and mobile platforms. It provides a reliable set of tools for game development, including physics engines, sprite handling, animations, input handling, and more. Developers can create games using JavaScript or TypeScript, with support for WebGL and Canvas rendering.
What are we going to build?
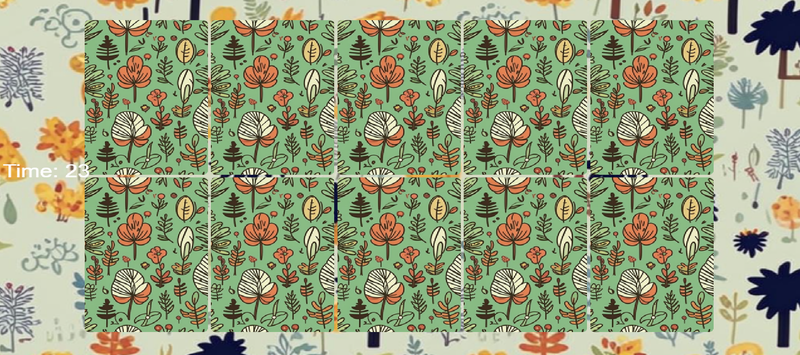
We’ll create a simple game where 10 cards are displayed, and the goal is to open them one by one within 30 seconds. You’ll be able to adjust the time limit and the number of cards as needed.
1. Setup the Game
We will use the official PhaserJS starter template integrated with React. This will save us time by providing pre-built EventEmitter and Scenes, allowing us to focus on the core game logic.
Clone the template
git clone https://github.com/phaserjs/template-react-ts phaser-memory-game
We’ve copied the template, now let’s install all the necessary dependencies.
Once that’s done, let’s go through the template’s structure before we clean it up.

Let’s quickly go over the purpose of the folders. We won’t be reviewing the configuration files, as it’s assumed you’re already familiar with React and Vite.
Project structure
- public: Contains assets and CSS.
- game: The main folder for the game.
- App.tsx: Connects PhaserJS with React.
- vite: Vite configuration folder.
Inside the game folder:
- scenes: Holds game scene files.
- EventBus: Manages events between Phaser and React.
- PhaserGame.tsx: React component that includes the game.
- main.ts: The main configuration for PhaserJS.
Clean the template files
Remove everything from App.tsx except the following code:
import { useRef } from 'react';

import { IRefPhaserGame, PhaserGame } from './game/PhaserGame';

import { IRefPhaserGame, PhaserGame } from './game/PhaserGame';

function App() {
  //  References to the PhaserGame component (game and scene are exposed)
  const phaserRef = useRef<IRefPhaserGame | null>(null);

  return (
    <div id='app'>
      <PhaserGame ref={phaserRef} />
    </div>
  );
}

export default App;
Here, we pass a ref to our game component, and that’s all.
Now, remove everything from PhaserGame.tsx except this code:
import { forwardRef, useLayoutEffect, useRef } from 'react';

import StartGame from './main';

import StartGame from './main';

export interface IRefPhaserGame {
  game: Phaser.Game | null;
  scene: Phaser.Scene | null;
}

export const PhaserGame = forwardRef<IRefPhaserGame>(function PhaserGame(
  { currentActiveScene },
  ref
) {
  const game = useRef<Phaser.Game | null>(null!);

  useLayoutEffect(() => {
    if (game.current === null) {
      game.current = StartGame('game-container');

      if (typeof ref === 'function') {
        ref({ game: game.current, scene: null });
      } else if (ref) {
        ref.current = { game: game.current, scene: null };
      }
    }

    return () => {
      if (game.current) {
        game.current.destroy(true);
        if (game.current !== null) {
          game.current = null;
        }
      }
    };
  }, [ref]);

  return <div id='game-container'></div>;
});
Next, delete the files: EventBus.ts, scenes/MainMenu.ts and scenes/GameOver.ts, as they are not needed for our project.
Modify game/main.ts file
import { Boot } from './scenes/Boot';
import { Game as MainGame } from './scenes/Game';
import { Preloader } from './scenes/Preloader';
import { AUTO, Game } from 'phaser';

import { Boot } from './scenes/Boot';
import { Game as MainGame } from './scenes/Game';
import { Preloader } from './scenes/Preloader';
import { AUTO, Game } from 'phaser';

//  Find out more information about the Game Config at:
//  https://newdocs.phaser.io/docs/3.70.0/Phaser.Types.Core.GameConfig
const config: Phaser.Types.Core.GameConfig = {
  type: AUTO,
  width: 1280,
  height: 720,
  parent: 'game-container',
  backgroundColor: '#ffffff',
  scale: {
    width: 1280,
    height: 720,
  },
  physics: {
    default: 'arcade',
    arcade: {
      debug: false,
    },
  },
  render: {
    antialiasGL: false,
    pixelArt: true,
  },
  canvasStyle: `display: block; width: 100%; height: 100%;`,
  autoFocus: true,
  audio: {
    disableWebAudio: false,
  },
  scene: [Boot, Preloader, MainGame],
};

const StartGame = (parent: string) => {
  const game = new Game({ ...config, parent });

  return game;
};

export default StartGame;
This is the standard configuration where we set the game’s width and height, canvas styles, and more. While the final configuration file is quite important, everything here is fairly intuitive.
Our template still contains unnecessary assets and code, but we will clean those up as we progress through the development.
2. Starting Game Development
Let’s begin developing our game.
Display the background.

Save this image as assets/bg.png.
Add the Background in Boot.ts
The boot scene is specifically designed to load assets that will be used in the game. This way, when we access to the next scene, our background will already be loaded.
// Boot.ts
import { Scene } from 'phaser';

import { Scene } from 'phaser';

export class Boot extends Scene {
  constructor() {
    super('Boot');
  }

  preload() {
    //  The Boot Scene is typically used to load in any assets you require for your Preloader, such as a game logo or background.
    //  The smaller the file size of the assets, the better, as the Boot Scene itself has no preloader.

    this.load.image('background', 'assets/bg.png');
  }

  create() {
    this.scene.start('Preloader');
  }
}
We have loaded the image, so now we can display it in any of our scenes using the identifier background.
Now, let’s show our background in the other scenes.
Preload.ts
import { Scene } from 'phaser';

import { Scene } from 'phaser';

export class Preloader extends Scene {
  constructor() {
    super('Preloader');
  }

  init() {
    //  We loaded this image in our Boot Scene, so we can display it here
    this.add.image(window.innerWidth / 2, window.innerHeight / 2, 'background');
  }

  create() {
    this.scene.start('MainMenu');
  }
}
In the preloader, we display our background at the center of the screen by calculating the center using window DOM.
Game.ts
import { Scene } from 'phaser';

import { Scene } from 'phaser';

export class Game extends Scene {
  background: Phaser.GameObjects.Image;

  constructor() {
    super('Game');
  }

  create() {
    this.background = this.add.image(0, 0, 'background').setOrigin(0, 0);
  }
}
Here’s a breakdown:
this.background adds a background image at coordinates (0, 0) and sets its origin to the top-left corner (setOrigin(0, 0)).
Run

Everything is set; we’ve displayed our background. Now, let’s move on and add the cards.
3. Adding the cards
Upload the card assets to the public/assets folder.


P.S. This is demo graphics created with AI. The quality is not great, but it will suffice for showcasing the capabilities of PhaserJS.
Next, we need to load these assets into the game using our Preloader scene.
preload() {
  //  Load the assets for the game - Replace with your own assets
  this.load.setPath("assets");

  this.load.image("card", "card.png");
  this.load.image("card1", "card1.png");
  this.load.image("card2", "card2.png");
  this.load.image("card3", "card3.png");
  this.load.image("card4", "card4.png");
  this.load.image("card5", "card5.png");
}
We’ve set up the assets folder and loaded the card assets.
Now, let’s test it… we’ll try displaying a card in the top-left corner. To do this, add the following code to the Game scene.

We can see the card in the top-left corner. Now, we need to distribute 10 such cards. To achieve this, we’ll create the getCardsPositions function.
But first, we need CONSTANTS. Let’s create a utils folder inside the src directory and add a constants.ts file.
export const ROWS = 2;
export const COLS = 5;
export const CARDS = [1, 2, 3, 4, 5];
export const TIMEOUT = 30;
These are all the constants we need for the game. You’ll understand the purpose of each one a bit later. Now, let’s return to our getCardsPositions function.
getCardsPosition(): { x: number; y: number }[] {
        const cardWidth = 196 + 5;
        const cardHeight = 306 + 5;
        const positions = [];
        const offsetX =
            (+this.sys.game.config.width - cardWidth * COLS) / 2 +
            cardWidth / 2;
        const offsetY =
            (+this.sys.game.config.height - cardHeight * ROWS) / 2 +
            cardHeight / 2;

        let id = 0;
        for (let r = 0; r < ROWS; r++) {
            for (let c = 0; c < COLS; c++) {
                positions.push({
                    x: offsetX + c * cardWidth,
                    y: offsetY + r * cardHeight,
                    delay: ++id * 100,
                });
            }
        }
        Phaser.Utils.Array.Shuffle(positions);
        return positions;
    }
This function calculates the positions of cards on the game board and returns an array of objects, each containing the x and y coordinates of a card.
Card Dimensions:
cardWidth: The width of each card is set to 196 plus 5 pixels of padding (total: 201). cardHeight: The height of each card is set to 306 plus 5 pixels of padding (total: 311).
Offset Calculation:
offsetX: The horizontal offset centers the cards on the screen. It subtracts the total width of the card grid from the total game width, divides it by 2 to center it, and adds half a card width to ensure proper positioning. offsetY: Similarly, the vertical offset centers the cards on the screen using the total height of the card grid and game height.
Loop through Rows and Columns:
- The function loops through ROWS and COLS (presumably constants representing the number of rows and columns on the grid).
- For each row (r) and column (c), it calculates the position of a card and pushes it into the positions array.
- The x position is calculated using the offset plus the column index multiplied by the card width.
- The y position is calculated similarly using the row index multiplied by the card height.
- delay is an optional property that adds a unique delay to each card’s animation, incrementing by 100ms with each card.
Shuffle:
The Phaser.Utils.Array.Shuffle method randomly shuffles the positions array to ensure the cards are distributed randomly.
Purpose:
This function sets up the grid of cards in random positions, ensuring they are evenly distributed and properly centered on the game board.
Now we’ll get the positions in the create method and generate the cards in a loop.
create() {
        this.background = this.add.image(0, 0, "background").setOrigin(0, 0);

        const positions = this.getCardsPosition();

        for (const pos of positions) {
            this.add.sprite(pos.x, pos.y, "card").setOrigin(0.5, 0.5);
        }
    }
We have displayed the cards on the screen. The next step is to create a separate prefab, which will help us move all the necessary code into the Card class. This way, we can organize our code better and clean up the Game scene.
Create prefab card
In Phaser, prefabs (classes) are reusable game objects that encapsulate both functionality and appearance, allowing developers to create instances of objects with predefined properties and behaviors.
Key Features of Prefabs in Phaser:
-
Encapsulation: A prefab can include properties (like position, size, or appearance) and methods (like actions or behaviors) that define how an object should behave in the game.
-
Reusability: Once a prefab is defined, you can create multiple instances of it throughout your game without duplicating code. This promotes DRY (Don’t Repeat Yourself) principles and simplifies maintenance.
-
Composition: Prefabs can be composed of other prefabs or game objects. This allows developers to build complex objects using simpler, reusable components.
-
Ease of Modification: Changes made to the prefab will automatically be reflected in all instances, making it easy to update behavior or appearance across the entire game.
-
Scene Management: Prefabs help organize game scenes by grouping related functionality and assets into cohesive units, making the codebase cleaner and easier to navigate.
Create file prefabs/Card.ts
class Card extends Phaser.GameObjects.Sprite {
  isOpened: boolean = false;
  positionX = 0;
  positionY = 0;
  delay = 0;

  constructor(scene: Phaser.Scene, value: number) {
    super(scene, 0, 0, 'card');
    this.scene = scene;
    this.value = value;
    this.setOrigin(0.5, 0.5);
    this.scene.add.existing(this);
    this.setInteractive();
  }

  init(x: number, y: number, delay: number) {
    this.positionX = x;
    this.positionY = y;
    this.delay = delay;
    this.setPosition(-this.width, -this.height);
  }
}

export default Card;
The code here may seem a bit odd, but we actually need it for future animations. You’ll understand why we defined the variables positionX and this.positionY a bit later.
This code defines a Card class that extends Phaser.GameObjects.Sprite. The class includes properties to track the card’s state and methods for initialization and interaction.
The init function is called automatically by Phaser, so we don’t need to call it ourselves anywhere.
We just need to connect everything in the Game.ts file. We’ll do this in a separate method called createCards and call it from the create function.
// Game.ts

cards: Card[] = [];

create() {
    this.background = this.add.image(0, 0, "background").setOrigin(0, 0);

    this.createCards();
}

createCards() {
    for (const card of CARDS) {
        for (let i = 0; i < ROWS; i++) {
            this.cards.push(new Card(this, card));
        }
    }
}
Now create method init to initialize the cards
initCards() {
    const positions = this.getCardsPosition();

    this.cards.forEach((card) => {
        const position = positions.pop();
        card.init(position?.x, position?.y, position?.delay);
        card.setPosition(card.positionX, card.positionY);
    });
}
Don’t forget to call it from the create method.
And voilà, we see the cards again!
4. Displaying the Cards on the Screen
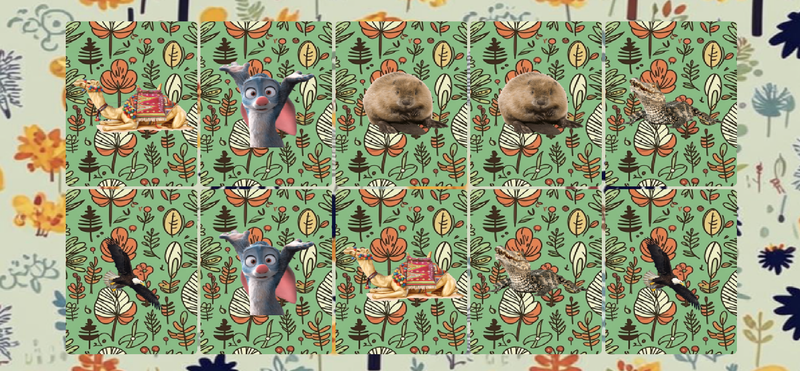
So far, we have only displayed one card, which is the backside of all the cards. Now, we need to show all the cards. We have five cards: card1, card2, …, card5, and we already have a constant named CARDS, which is an array containing the numbers from 1 to 5. We just need to put it all together.
For now, we’ll simply sort the array of cards and display their numbers in the prefab; we have already prepared everything for this.
In the initCards method, add the following code:
Phaser.Utils.Array.Shuffle(positions);Phaser provides utility classes, including one for working with arrays, which we will use for “sorting”.
Then, let’s return to the Card class and add the value to our sprite.
super(scene, 0, 0, 'card' + value);Now we can see all the cards opened.
5. Handling Input Events
We need the cards to flip open on click, rather than being open all the time.
Remove the recent changes in Card.ts, where we added the value just for testing. The cards will only be flipped open when clicked.
// Card.ts

super(scene, 0, 0, 'card');
Creating the First Animation
We need to implement four simple methods for complete control of the card: openCard, closeCard, flipCard, and showCard. Let’s get started!
openCard:
openCard() {
  this.isOpened = true;
  this.flipCard();
}
**closeCard: **
closeCard() {
  if (this.isOpened) {
      this.isOpened = false;
      this.flipCard();
  }
}
The property isOpened is a boolean that indicates whether the card is open or not. Finally, the method calls flipCard() to trigger the animation or logic responsible for visually flipping the card back to its closed state.
flipCard:
flipCard() {
this.scene.tweens.add({
    targets: this,
    scaleX: 0,
    ease: "Linear",
    duration: 150,
    onComplete: () => {
        this.showCard();
    },
});
}
This method adds a tween animation to the scene. A tween is used to change a property of an object over time in a smooth, animated way. This reduces the horizontal scale of the card to 0, making it appear as if the card is flipping horizontally and disappearing from view. Once the card finishes the flip (scaleX reaches 0), the onComplete function is triggered. It calls the showCard method.
showCard:
showCard() {
  // This line determines which texture (image) to show on the card.
  const texture = this.isOpened ? `card${this.value}` : "card";
  this.setTexture(texture);
  // This adds another tween animation, just like in the flipCard method, to animate the card's horizontal scaling.
  this.scene.tweens.add({
      targets: this,
      scaleX: 1,
      ease: "Linear",
      duration: 150,
  });
}
After flipping (where scaleX was set to 0), this sets the horizontal scale back to 1, making the card appear at its full width again.
We just need to introduce the openedCard field in the Game class. This field will either be null or of type Card. When one of the cards is opened, we will store it in this variable, and we will reset it to null when the card is closed.
openedCard: null | Card = null;Now we can create a handler function
Let’s call it onCardClicked
onCardClicked(pointer: { x: number; y: number }, card: Card) {
  // The first condition checks if the clicked card (card) is already open (card.isOpened). If so, the function returns false to prevent any further actions.

  if (card.isOpened) {
      return false;
  }
  if (this.openedCard) {
      if (this.openedCard.value === card.value) {
          this.openedCard = null;
          this.openCardCount++;
      } else {
        // If the cards don’t match, the previous card (this.openedCard) is closed by calling this.openedCard.closeCard(), and openedCard is updated to reference the newly clicked card.
          this.openedCard.closeCard();
          this.openedCard = card;
      }
  } else {
    // If no card is currently open (this.openedCard is null), the clicked card is set as openedCard.
      this.openedCard = card;
  }
  card.openCard();

  if (this.openCardCount === this.cards.length / 2) {
      this.start();
  }
}
This function controls the card-flipping logic. It handles card clicks, checks for matches, tracks the opened card, and manages the game’s progress.
Now we just need to connect this function in the createCards method.
this.input.on('gameobjectdown', this.onCardClicked, this);The last argument(this) is the context of the card.
Our game is almost ready; we’ve implemented the core game mechanics. The cards flip with an animation along the X-axis, and matching cards are remembered in sequence. The next step is to create the animation where the cards fly into position.
6. Card Flying Animation
We need to position the cards above the screen so that they appear to fly in from outside. We’ll place all the cards in the top left corner, outside the screen boundaries, and then move them one by one. This is where the delay value we calculated earlier comes into play.
Add move function to the Card prefab:
move() {
  this.scene.tweens.add({
      targets: this,
      x: this.positionX,
      y: this.positionY,
      ease: "Linear",
      delay: this.delay,
      duration: 250,
      onComplete: () => {
          this.showCard();
      },
  });
}
The move() method animates the card to its designated position using the PhaserJS tween system.
After the animation is complete, it calls the showCard() method to reveal the card by flipping it or showing its texture.
Let’s create two new functions in the Game class: showCards() to move the cards positioned off-screen, and start() to begin the game with the card movement animation.
- showCards() will loop through all the cards and call their move method to animate them onto the screen.
- start() will serve as the trigger to initiate this animation at the beginning of the game.
showCards:
showCards() {
  this.cards.forEach((card) => {
      card.move();
  });
}start:
start() {
    this.openCardCount = 0;
    this.timeout = TIMEOUT;
    this.initCards();
    this.showCards();
    this.cards.forEach((card) => {
      card.closeCard();
    });
}
Don’t forget to import TIMEOUT constant from the utils/constants.ts.
Call it from the create method:
this.start();Remove the setPosition call from the initCards method
initCards() {
  const positions = this.getCardsPosition();
  Phaser.Utils.Array.Shuffle(positions);

  this.cards.forEach((card) => {
      const position = positions.pop();
      card.init(position?.x, position?.y, position?.delay);
      //   card.setPosition(card.positionX, card.positionY);
  });
}
Run the test

We’ve completed the Card prefab. Here’s the full code for the class:
class Card extends Phaser.GameObjects.Sprite {
  isOpened: boolean = false;
  positionX = 0;
  positionY = 0;
  delay = 0;

  constructor(scene: Phaser.Scene, value: number) {
    super(scene, 0, 0, 'card');
    this.scene = scene;
    this.value = value;
    this.setOrigin(0.5, 0.5);
    this.scene.add.existing(this);
    this.setInteractive();
  }

  init(x: number, y: number, delay: number) {
    this.positionX = x;
    this.positionY = y;
    this.delay = delay;
    this.setPosition(-this.width, -this.height);
  }

  move() {
    this.scene.tweens.add({
      targets: this,
      x: this.positionX,
      y: this.positionY,
      ease: 'Linear',
      delay: this.delay,
      duration: 250,
      onComplete: () => {
        this.showCard();
      },
    });
  }

  openCard() {
    this.isOpened = true;
    this.flipCard();
  }

  closeCard() {
    if (this.isOpened) {
      this.isOpened = false;
      this.flipCard();
    }
  }

  flipCard() {
    this.scene.tweens.add({
      targets: this,
      scaleX: 0,
      ease: 'Linear',
      duration: 150,
      onComplete: () => {
        this.showCard();
      },
    });
  }

  showCard() {
    const texture = this.isOpened ? `card${this.value}` : 'card';
    this.setTexture(texture);
    this.scene.tweens.add({
      targets: this,
      scaleX: 1,
      ease: 'Linear',
      duration: 150,
    });
  }
}

export default Card;
Conclusion
We’ve successfully built a game using PhaserJS, integrating core mechanics such as flipping cards, animating movements, and handling user input. This project showcases how PhaserJS can be a powerful framework for creating dynamic and interactive games with rich visual experiences. From loading assets to handling game logic, PhaserJS provides an intuitive API that simplifies game development while offering reliable features for animations and user interactions.
Through this game, we’ve learned how to:
- Organize game logic into scenes and prefabs.
- Animate objects with tweens for smooth transitions.
- Manage game assets and ensure efficient loading through preloader scenes.
- Implement custom events and interactive elements like card flipping.
- Integrate PhaserJS into a broader development environment, like React, to create responsive, cross-functional applications.
This foundation sets the stage for building more complex games, adding multiplayer functionality, or incorporating additional physics and AI components.