
In this guide, you will wire Google and GitHub login into a Next.js 15 app with NextAuth, persist users in PostgreSQL through Prisma, and add a minimal ShadcnUI sign-in screen.
Prerequisites
- Basic knowledge of Next.js - Familiarity with Next.js and its folder structure will help.
- Node.js and npm installed - You’ll need both installed on your local machine.
- A GitHub and Google account - For testing the OAuth flow. Prisma CLI - Make sure you have the Prisma CLI installed, as we’ll use it to set up and migrate the database.
- Docker: Install Docker to easily manage your PostgreSQL database in a containerized environment. Refer to the Docker documentation for installation instructions.
- PostgreSQL: Familiarity with PostgreSQL is beneficial, as we will use it as our database.
- Familiarity with Prisma: Basic knowledge of Prisma ORM for managing database operations will be useful.
Steps to Create User Authentication
Start with the project setup, then configure the providers and database step by step.
Step 1: Initialize Next.js Project
Start by creating a new Next.js project.
Need to install the following packages:
create-next-app@15.0.2
Ok to proceed? (y) y

√ Would you like to use TypeScript? ... No / Yes
√ Would you like to use ESLint? ... No / Yes
√ Would you like to use Tailwind CSS? ... No / Yes
√ Would you like your code inside a `src/` directory? ... No / Yes
√ Would you like to use App Router? (recommended) ... No / Yes
√ Would you like to use Turbopack for next dev? ... No / Yes
√ Would you like to customize the import alias (@/* by default)? ... No / Yes
Creating a new Next.js app in C:\Users\useR\Desktop\NextJS\next-auth-prisma.

Using npm.

Initializing project with template: app-tw


Installing dependencies:
- react
- react-dom
- next

Installing devDependencies:
- typescript
- @types/node
- @types/react
- @types/react-dom
- postcss
- tailwindcss
- eslint
- eslint-config-next
then
Once your project is created, install dependencies:
- next-auth: Handles authentication.
- @prisma/client and prisma: Used to interact with the database and manage user data.
Now, initialize your Prisma ORM project by generating a Prisma schema file using this command:
Step 2: Setup a Database
Before connecting our database, we first need to create it. To understand Docker better, you can refer to our article, How to Set Up a Local PostgreSQL Using Docker Compose.
Open the Docker application, and if you have other PostgreSQL containers running, stop them to avoid port conflicts. Then, create a docker-compose.yml file and add the following code to it:
version: '3.8'

services:
  db:
    image: postgres:latest
    container_name: next-oauth-prisma
    environment:
      POSTGRES_USER: postgres_user
      POSTGRES_PASSWORD: postgres_password
      POSTGRES_DB: postgres_auth
    ports:
      - '5432:5432'
    volumes:
      - postgres_data:/var/lib/postgresql/data
      - ./init.sql:/docker-entrypoint-initdb.d/init.sql # Optional: initialize with SQL script

volumes:
  postgres_data:
This Docker Compose file is configured to set up a PostgreSQL database container for your Next.js project with Prisma. Here’s a breakdown:
- image: postgres:latest pulls the latest PostgreSQL image from Docker Hub.
- container_name: Names the container next-oauth-prisma, which makes it easy to reference.
- environment: Sets PostgreSQL environment variables:
- POSTGRES_USER: the username (set here to postgres_user).
- POSTGRES_PASSWORD: the password (postgres_password).
- POSTGRES_DB: the name of the initial database to be created (postgres_auth).
- ports: Exposes the container’s PostgreSQL port (5432) to the host’s port 5432. This makes the database accessible from outside the container via
localhost:5432.
volumes:
- postgres_data:/var/lib/postgresql/data: Mounts a named volume postgres_data to persist database data on the host, so data is preserved between container restarts.
- ./init.sql:/docker-entrypoint-initdb.d/init.sql: Mounts an optional SQL script (
init.sql), which can initialize the database with predefined tables or values on first run. This script is run automatically by PostgreSQL at startup if present.
Run
Running docker-compose up -d is a way to start the containers defined in your docker-compose.yml file with some specific advantages:
- Detached Mode (
-d): The-dflag stands for “detached mode,” meaning the containers will run in the background. This allows you to keep using your terminal for other commands while your Docker services are running. - Automatic Setup: This command automatically builds and starts up all the services defined in your
docker-compose.ymlfile. In this case, it will set up and start the PostgreSQL database container with the specified configuration. - Persistent Services: Running the container in detached mode is ideal for databases and other services that need to run continuously, as they keep running even if you close the terminal. You can stop them later using
docker-compose down. - Networking and Dependencies: If there are multiple services in your
docker-compose.ymlfile that depend on each other,docker-compose up -dwill ensure they start in the correct order and are networked together as defined.
In short, using docker-compose up -d is a convenient way to start your database in the background, letting you continue development without an open Docker terminal session.
Step 3: Configure Prisma
Configure Prisma by creating a .env file in the root directory with the following:
DATABASE_URL="postgresql://postgres_user:postgres_password@localhost:5432/postgres_auth?schema=public"Replace username, password, and postgres_auth with your actual credentials.
Define the User Model in Prisma
Open prisma/schema.prisma and define the User model for NextAuth. Also, configure Prisma to use PostgreSQL.
// This is your Prisma schema file,
// learn more about it in the docs: https://pris.ly/d/prisma-schema

// Looking for ways to speed up your queries, or scale easily with your serverless or edge functions?
// Try Prisma Accelerate: https://pris.ly/cli/accelerate-init

generator client {
  provider = "prisma-client-js"
}

datasource db {
  provider = "postgresql"
  url      = env("DATABASE_URL")
}

model User {
  id            String    @id @default(cuid())
  name          String?
  email         String    @unique
  emailVerified DateTime?
  image         String?
  role          String?
  accounts      Account[]
  sessions      Session[]

  createdAt DateTime @default(now())
  updatedAt DateTime @updatedAt

  @@map("users")
}

model Account {
  userId            String
  type              String
  provider          String
  providerAccountId String
  refresh_token     String?
  access_token      String?
  expires_at        Int?
  token_type        String?
  scope             String?
  id_token          String?
  session_state     String?

  createdAt DateTime @default(now())
  updatedAt DateTime @updatedAt

  user User @relation(fields: [userId], references: [id], onDelete: Cascade)

  @@id([provider, providerAccountId])
  @@map("accounts")
}

model Session {
  sessionToken String   @unique
  userId       String
  expires      DateTime
  user         User     @relation(fields: [userId], references: [id], onDelete: Cascade)

  createdAt DateTime @default(now())
  updatedAt DateTime @updatedAt

  @@map("sessions")
}

model VerificationToken {
  identifier String
  token      String
  expires    DateTime

  @@id([identifier, token])
  @@map("verification_tokens")
}
Each model represents a table in the database, with Prisma creating these tables based on the defined schema. Here’s a breakdown of each model:
User Model
Defines a table for user information with fields for basic attributes like name, email, and role. Key points include:
- id: A unique identifier with a default value generated by cuid().
- email: A unique email field.
- createdAt and updatedAt: Timestamps to track creation and update times, with updatedAt auto-updating on changes.
- Relationships with other models (
AccountandSession) are represented as arrays. - @@map(“users”): Renames the table in the database to users.
Account Model
Stores information about users’ accounts for third-party providers like Google or GitHub:
- userId: Links to the
Usermodel through a foreign key, creating a relationship with theUsertable. - Other fields, like
access_token,refresh_token, andexpires_at, store authentication data. - @@id([provider, providerAccountId]): Composite primary key across
providerandproviderAccountIdfields, enforcing uniqueness for each account. - @@map(“accounts”): Names the table accounts in the database.
Session Model
Tracks each login session for users:
- sessionToken: A unique session identifier.
- expires: Indicates session expiry time.
- The
userfield defines a foreign key relationship to theUsertable, with sessions deleted if the associated user is removed. - @@map(“sessions”): Names the table
sessionsin the database.
VerificationToken Model
Used for managing passwordless login or account verification tokens:
-
identifierandtokenact as composite primary keys, ensuring uniqueness. - expires: Expiration timestamp for the token.
- @@map(“verification_tokens”): Names the table
verification_tokens.
This schema allows for efficient management of user data, third-party account integrations, user sessions, and account verifications for a complete authentication system.
Run the following commands to create and migrate your database:
Step 4: Install ShadcnUI Package
We won’t be building the entire project; instead, we’ll just create a navbar with a user dropdown menu. To do this, we only need two components from the Shadcn library: Button and Dropdown Menu.
Run the following command to install the required ShadcnUI components package:
Which style would you like to use? › New York
Which color would you like to use as base color? › Zinc
Do you want to use CSS variables for colors? › no / yes
Add ShadcnUI Components
and
Now we’ve added everything needed to our project. In the next section, we’ll start building our UI and connect to the database.
Try running the project with:
Note: The latest version of Next.js has a bug with webpack, causing the error: “Module parse failed: Bad character escape sequence.” We’ve previously covered a solution for this issue — read more about it here.
Create UI
Here’s what we aim to build:

To achieve this, we’ll need the following components: logo, header, navbar, and user-button.
Logo component
Create logo.tsx file inside the ui folder:
import Link from 'next/link';

import Link from 'next/link';

const Logo = () => {
  return (
    <Link href='/'>
      <div className='flex items-center gap-2'>
        <span className='bg-main p-2'>
          <svg
            width='27px'
            height='27px'
            viewBox='0 0 24 24'
            xmlns='http://www.w3.org/2000/svg'
            fill='none'
            strokeWidth='1'
            strokeLinecap='round'
            strokeLinejoin='miter'
            className='stroke-black dark:stroke-white'
          >
            <path d='M9,3H8A3,3,0,0,0,5,6V9a3,3,0,0,1-3,3H2a3,3,0,0,1,3,3v4a3,3,0,0,0,3,3H9'></path>
            <path d='M15,3h1a3,3,0,0,1,3,3V9a3,3,0,0,0,3,3h0a3,3,0,0,0-3,3v4a3,3,0,0,1-3,3H15'></path>
          </svg>
        </span>
        <div className='flex gap-1 text-lg'>
          <span className='font-montserrat text-primary'>Logo</span>
        </div>
      </div>
    </Link>
  );
};
export default Logo;
User Button Component
Create user-button.tsx inside the components folder
import { Button } from './ui/button';
import {
  DropdownMenu,
  DropdownMenuContent,
  DropdownMenuGroup,
  DropdownMenuItem,
  DropdownMenuLabel,
  DropdownMenuSeparator,
  DropdownMenuTrigger,
} from './ui/dropdown-menu';
import avatarPlaceholder from '@/assets/images/avatar_placeholder.png';
import { Lock, LogOut, Settings } from 'lucide-react';
import { User } from 'next-auth';
import { signOut } from 'next-auth/react';
import Image from 'next/image';
import Link from 'next/link';

interface UserButtonProps {
  user: User;
}

export default function UserButton({ user }: UserButtonProps) {
  return (
    <DropdownMenu>
      <DropdownMenuTrigger asChild>
        <Button size='icon' className='flex-none rounded-full'>
          <Image
            src={user.image || avatarPlaceholder}
            alt='User profile picture'
            width={50}
            height={50}
            className='aspect-square rounded-full bg-background object-cover'
          />
        </Button>
      </DropdownMenuTrigger>
      <DropdownMenuContent className='w-56'>
        <DropdownMenuLabel>{user.name || 'User'}</DropdownMenuLabel>
        <DropdownMenuSeparator />
        <DropdownMenuGroup>
          <DropdownMenuItem asChild>
            <Link href='/settings'>
              <Settings className='mr-2 h-4 w-4' />
              <span>Settings</span>
            </Link>
          </DropdownMenuItem>
          {user.role === 'admin' && (
            <DropdownMenuItem asChild>
              <Link href='/admin'>
                <Lock className='mr-2 h-4 w-4' />
                Admin
              </Link>
            </DropdownMenuItem>
          )}
        </DropdownMenuGroup>
        <DropdownMenuSeparator />
        <DropdownMenuItem asChild>
          <button
            onClick={() => signOut({ callbackUrl: '/' })}
            className='flex w-full items-center'
          >
            <LogOut className='mr-2 h-4 w-4' /> Sign Out
          </button>
        </DropdownMenuItem>
      </DropdownMenuContent>
    </DropdownMenu>
  );
}
Navbar Component
Our login component will have three states: loading, sign in, and an avatar with a dropdown menu. To set this up, we need to follow these steps:
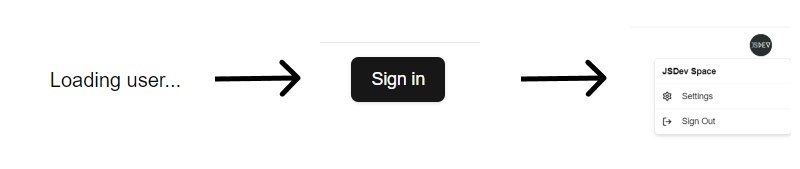
Here’s how to do it:
// navbar.tsx

'use client';

import { Button } from './ui/button';
import UserButton from './user-button';
import { signIn, useSession } from 'next-auth/react';

import { Button } from './ui/button';
import UserButton from './user-button';
import { signIn, useSession } from 'next-auth/react';

// navbar.tsx

// navbar.tsx

// navbar.tsx

// navbar.tsx

// navbar.tsx

// navbar.tsx

// navbar.tsx

// navbar.tsx

// navbar.tsx

// navbar.tsx

// navbar.tsx

const Navbar = () => {
  const session = useSession();
  const user = session.data?.user;

  return (
    <nav className='flex w-[60%] flex-col items-center justify-center gap-2 max-sm:mt-8 sm:w-fit sm:flex-row'>
      {user && <UserButton user={user} />}
      {!user && session.status === 'loading' && <span>Loading user...</span>}
      {!user && session.status !== 'loading' && (
        <Button onClick={() => signIn()}>Sign in</Button>
      )}
    </nav>
  );
};
export default Navbar;-
useSessionhook fetches the current session’s state and data, assigning it tosession. - The
uservariable extracts theuserobject from the session data.
Rendering Logic:
If the user is logged in (user exists):
- The UserButton component is rendered, displaying user-related options (e.g., an avatar with a dropdown menu).
If the session is loading (user state is undetermined):
- It displays “Loading user…” to inform users that the status is being fetched.
If no user is logged in (and session isn’t loading):
- It shows a Sign in button, which triggers the signIn function when clicked.
To add the user variable to the session, we need to adjust our layout.tsx slightly by wrapping it with our session HOC (Higher Order Component).
Layout Component
// layout.tsx
import './globals.css';
import Header from '@/components/header';
import type { Metadata } from 'next';
import { SessionProvider } from 'next-auth/react';
import localFont from 'next/font/local';

import './globals.css';
import Header from '@/components/header';
import type { Metadata } from 'next';
import { SessionProvider } from 'next-auth/react';
import localFont from 'next/font/local';

const geistSans = localFont({
  src: './fonts/GeistVF.woff',
  variable: '--font-geist-sans',
  weight: '100 900',
});
const geistMono = localFont({
  src: './fonts/GeistMonoVF.woff',
  variable: '--font-geist-mono',
  weight: '100 900',
});

export const metadata: Metadata = {
  title: 'Create Next App',
  description: 'Generated by create next app',
};

export default function RootLayout({
  children,
}: Readonly<{
  children: React.ReactNode;
}>) {
  return (
    <html lang='en'>
      <body
        className={`${geistSans.variable} ${geistMono.variable} antialiased`}
      >
        <SessionProvider>
          <Header />
          {children}
        </SessionProvider>
      </body>
    </html>
  );
}
Declare a module augmentation for next-auth:
Create a file src/types/next-auth.d.ts
import { DefaultSession } from 'next-auth';

import { DefaultSession } from 'next-auth';

declare module 'next-auth' {
  interface Session {
    user: User & DefaultSession['user'];
  }

  interface User {
    role: string | null;
  }
}
The Session interface is modified to add a user object that combines User and the default structure of user in DefaultSession. This helps TypeScript understand that your session’s user now includes the additional properties you defined in the User interface.
A new User interface is defined, adding a role property (type string | null) to store additional user role information. This is useful when you want to store user roles in the session for access control.
By adding these properties, you gain strongly typed access to user.role when working with NextAuth sessions, which makes it easier to implement role-based features or access control in your app.
Declare globalThis.prismaGlobal
Create a file src/lib/prisma.ts
import { PrismaClient } from '@prisma/client';

import { PrismaClient } from '@prisma/client';

const prismaClientSingleton = () => {
  return new PrismaClient();
};

declare const globalThis: {
  prismaGlobal: ReturnType<typeof prismaClientSingleton>;
} & typeof global;

const prisma = globalThis.prismaGlobal ?? prismaClientSingleton();

export default prisma;

if (process.env.NODE_ENV !== 'production') globalThis.prismaGlobal = prisma;
In summary, this code helps avoid reinitializing Prisma in development by using a singleton pattern, optimizing both development and production performance.
All that’s left is to create the Header component, where we’ll combine our logo and navbar, and then integrate it into layout.tsx.
Header Component
// header.tsx
import Navbar from './navbar';
import Logo from './ui/logo';

import Navbar from './navbar';
import Logo from './ui/logo';

const Header = () => {
  return (
    <div className='light-gradient dark:dark-gradient font-public-sans'>
      <div className='m-4 mx-8 mt-9 flex flex-col items-center justify-between sm:mt-2 sm:flex-row'>
        <Logo />
        <div className='flex flex-row justify-end gap-14'>
          <Navbar />
        </div>
      </div>
    </div>
  );
};
export default Header;
Test it
Set Up NextAuth
Now, we’ll set up NextAuth to authenticate users using Google and GitHub. In the app/api/auth/[...nextauth] directory, create a new folder called auth and a file called route.ts.
import { handlers } from '@/auth';

import { handlers } from '@/auth';

export const { GET, POST } = handlers;
In the root directory create 2 files: _middleware.ts and auth.ts
auth.ts
// auth.ts
import prisma from './lib/prisma';
import { PrismaAdapter } from '@auth/prisma-adapter';
import NextAuth from 'next-auth';
import { Adapter } from 'next-auth/adapters';
import GitHub from 'next-auth/providers/github';
import Google from 'next-auth/providers/google';

import prisma from './lib/prisma';
import { PrismaAdapter } from '@auth/prisma-adapter';
import NextAuth from 'next-auth';
import { Adapter } from 'next-auth/adapters';
import GitHub from 'next-auth/providers/github';
import Google from 'next-auth/providers/google';

export const { handlers, signIn, signOut, auth } = NextAuth({
  trustHost: true,
  theme: {
    logo: '/logo.png',
  },
  adapter: PrismaAdapter(prisma) as Adapter,
  callbacks: {
    session({ session, user }) {
      session.user.role = user.role;
      return session;
    },
  },
  providers: [Google, GitHub],
});
In this file:
- We define Google and GitHub as OAuth providers.
- We configure the PrismaAdapter to manage data in the database.
_middleware.ts
export { auth as middleware } from '@/auth';Add your Google and GitHub OAuth credentials to the .env file:
GOOGLE_CLIENT_ID=your-google-client-id
GOOGLE_CLIENT_SECRET=your-google-client-secret
GITHUB_CLIENT_ID=your-github-client-id
GITHUB_CLIENT_SECRET=your-github-client-secret
NEXTAUTH_URL=http://localhost:3000
GitHub OAuth App
Creating a new GitHub OAuth App involves a few steps within the GitHub developer settings. Here’s a quick guide to help you set it up:
1. Go to GitHub Developer Settings:
- Log in to your GitHub account.
- Navigate to GitHub Developer Settings by clicking on your profile icon, selecting Settings, and then Developer settings from the sidebar.
2. Create a New OAuth App:
- In the OAuth Apps section, click on New OAuth App.
3. Fill in the OAuth App Details:
- Application name: Enter a name for your app, which users will see when authorizing.
- Homepage URL: Add the main URL for your application, such as
https://localhost:3000. - Authorization callback URL: Enter the URL where GitHub should redirect users after they authorize, typically something like https://localhost:3000/api/auth/callback/github (depending on how you’ve set up your app to handle callbacks).
4. Register the Application:
- Once all fields are filled in, click Register application. GitHub will generate a Client ID and Client Secret for your OAuth app.
5. Secure the Client Secret:
- Copy the Client ID and Client Secret. Keep these safe, as you’ll need them to configure OAuth in your application, and don’t expose them publicly.
6. Use in Application:
In your application code, use the Client ID and Client Secret to configure GitHub as an authentication provider (for example, using NextAuth or a similar library).
Your GitHub OAuth App is now ready! You can use it to authenticate users through GitHub in your application.
Google OAuth App
To create a new Google OAuth App, follow these steps within the Google Cloud Console:
1. Go to the Google Cloud Console:
- Visit Google Cloud Console and log in with your Google account.
2. Create or Select a Project:
- From the top menu, click Select a project.
- Choose an existing project or click New Project to create a new one specifically for your app.
3. Enable the OAuth API:
- In the left sidebar, go to APIs & Services > Library.
- Search for Google Identity or OAuth and click Enable on the Google Identity API.
4. Configure the OAuth Consent Screen:
- Go to APIs & Services > OAuth consent screen.
- Select External if your app will be available to general users, or Internal if it’s restricted to your organization (G Suite users only).
- Fill out the App name, User support email, and any other required fields.
- In Scopes for Google APIs, add scopes relevant to your app (e.g., user profile data).
- Save and continue to configure the consent screen.
5. Create OAuth Credentials:
- Navigate to APIs & Services > Credentials and click on Create Credentials > OAuth Client ID.
- For Application type, choose Web application.
- Under Authorized redirect URIs, add the callback URL for your application. This is typically in the format:
https://localhost:3000/api/auth/callback/google
Replace localhost:3000 with your app’s actual domain.
6. Save Your Client ID and Client Secret:
- After creating the credentials, Google will provide a Client ID and Client Secret.
- Copy these, as you’ll need them to configure Google authentication in your app.
Your Google OAuth App is now configured and ready for use in your application.
We have one last step: configuring remote image handling in Next.js. To load images from external sources like Google and GitHub in our Next.js app, we need to set trusted image sources in the next.config.ts configuration file. Here’s how:
// @type {import('next').NextConfig}
const nextConfig = {
  images: {
    remotePatterns: [
      {
        protocol: 'https',
        hostname: 'lh3.googleusercontent.com', // Google profile images
      },
      {
        protocol: 'https',
        hostname: 'avatars.githubusercontent.com', // GitHub profile avatars
      },
    ],
  },
};

export default nextConfig;
The remotePatterns array lists trusted sources for loading images from external domains. This is useful when users authenticate with Google or GitHub, allowing us to display their profile images securely.
Test and Verify Authentication
After setting up the database, NextAuth configurations, and UI, you can test the authentication workflow. When a user signs in with Google or GitHub, NextAuth will store their information in the database via Prisma, enabling a smooth authentication experience across sessions.
Wrapping Up
At this point, your app supports OAuth sign-in with persistent sessions and a database-backed user model. From here, extend the same setup with role-based access and protected routes.